Fiber Arts Friday – Flannel Blanket Pattern

Welcome back Fiber Arts Friday visitors!

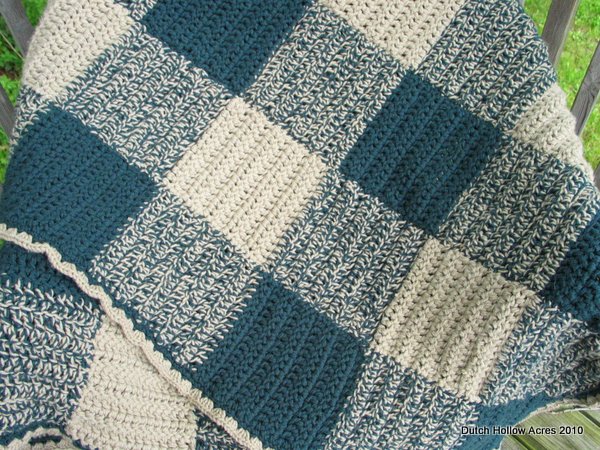
I finished my mom’s blanket!  It’s already been washed, and is wrapped and waiting for later this month so I can give it to her.  Too bad it’s the start of summer, she might not get to enjoy it until much later since it’s such a thick blanket. 

A friend of mine really liked the blanket and asked for one so that means I actually have to duplicate it!  Yikes.  So, I wrote down the pattern for myself which means I have a pattern to share with all of you!

Country Flannel Blanket Pattern (PDF) – Printer friendly

This blanket is made in strips each strip containing (10) 7×7 inch squares and 6 strips total. Finished blanket size will be 6×4 feet. The strips are made by using 2 strands of yarn at once.  It is a very thick and heavy blanket (6lbs) and it works up very fast.  I crochet slowly and the blanket only took me 15 working hours to finish to give you an idea of how fast it goes.

Materials:
(3) Caron One Pound Yarn – Taupe
(3) Caron One Pound Yarn – Forest Green
Size ‘N’ Hook
Size ‘K’ Hook
Darning needle

Strips 1, 3, & 5

Square 1
Row 1 – Using 2 strands of forest green chain a row of 18 with the N hook
Row 2 – DC in 2nd stitch from hook, DC in each stitch to the end, CH 2 and turn (16) Length should measure 7” add/dec stitches if needed
Row 3-? – DC in each stitch to the end of the row, CH 2 and turn (End your square when it measures 7×7 inches)
Last row of square – do not CH2 and cut a 5″ tail off one of your green yarn
(Note: with the exception of the start of the 1st row of the strip, all of your tails will end on the same side of the strip)

Square 2
Row 1
– tie in taupe yarn leave a tail to darn in later – CH2 – DC in each stitch to end of row, CH2 and turn
Row 2-? – DC in each stitch to the end of the row, CH 2 and turn (End your square when it measures 7×7 inches)
Last row of square – do not CH2 and cut a 5″ tail off one of your taupe yarn

Square 3-10
Repeat Square 2 alternating with 2 green and 1 green 1 taupe until all 10 squares are complete

Strips 2, 4, & 6
Follow same instructions above but alternate using 2 taupe and 1 taupe and one green

Darn all your tails into your work and whip stitch the strips together.  Take care to line up the squares and check as you go.  I had the misfortune of finishing a row and then held it up just miss an alignment half way through the row! Errrr…
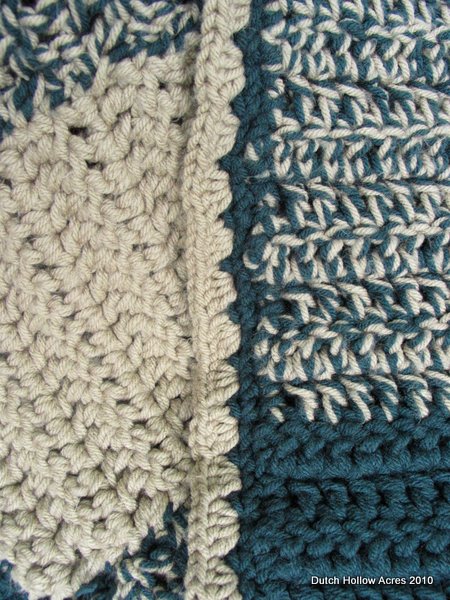
Boarder:
Still using the ‘N’ hook but using only 1 strand of green yarn SC all the way around the blanket 2x, Add a SC in each corner so they remain square

Switch to the ‘K’ hook and 1 strand of taupe yarn
Tie your yarn in, Skip a stitch and DC 4x in the next stitch, skip a stitch and repeat 4 DC all the way around the blanket.  This boarder is meant to add a very slight ruffle to the edge and soften up the look of all those squares.

Fiber Arts Friday – Crochet Rag Rug

Welcome Fiber Arts Friday Folks

Last week I spent a lot of time cleaning the screen porch and getting all the leaves and dirt out of there that blew in through a hole last fall.  What a mess.  After I got the floor cleaned it looked so bare.  It wanted something, a rug.  I still had some old flannel sheets hanging around so I got to work ripping them into strips.

I decided on making a rectangle rug with a random color pattern.  It turns out that was the best choice because I ran out of the beige color!  I ended up replacing it with a more ivory color sheet which at a quick glance you don’t notice but if you look at it hard enough you can see where half the rug has beige and the other half has an ivory look. 

The method I used to connect the strips is exactly the same as the Christmas Rag Rug I made for my brother.  This time I decided not to make the rug the “toothbrush” way but crocheted it instead.  Crochet is faster and makes the rug a bit thicker but doesn’t wear as well as a toothbrush or braided rug.

Directions:

Making Fabric Strips:
For my rug project I decided to repurpose some old flannel sheets.  I cut a little slits along one edge of the sheet every ½ to an  inch or so.  Now comes the fun part!  Grab that little fabric tag and rip!  The flannel sheets tore very evenly right down to the end without the need to cut each strip out by hand.  If you have a cat hanging around this process is very fascinating and you might have to fight for some of your strips back.

How To Connect Fabric Strips:
Now that you have all of these strips hanging around you need to be able to put them together.  Many suggestions have you sewing the strips together, which is great, if you have that kind of time to waste.  Easiest method I found is to cut a small slit in the ends of each strip and slipknot them together.  Thread one strip through the slit you made in the other and then feed the tail of the 1st strip through the slit you made in the end.  Pull tight and voila you have connected the 2 strips together.


Hook Size: S-35
Stitch: Single Crochet
Pattern: SC a chain the length you want the rug +1 SC and turn repeat until the width desired is reached.
Color Pattern: I chose to do a random pattern so I connected the strips as I went.
Fringe: Cut fabric strips into 8″ lengths.  Fold in half and feed the fold through the end and slip the tails through the fold and tighten.

Finished rug size came out to 2ft x 3ft! My dog Brindee has claimed the rug as her own already. *sigh* maybe it’ll end up being a pet rug instead.

Crochet Kitty Koozie – Cat Bed


Well we don’t call it a Kitty Koozie to us it’s a Bacon Wrap.  Yes, I named my cat Bacon, I can’t say I’m a cat lover so I named it after something I do love.  Mmmm…. Bacon.

So what is it?   Out of scrap yarn I crocheted little pocket for our Bacon to hide in.  I doubled up on the yarn for the bottom and single crochet a mat so it offers a thick pad.  For the pocket top I switched to single yarn and a double crochet.  This makes the top part light enough that she can dig into it and has stretch so it’ll fit her body snugly. 

The result is a perfect hiding spot for a cold kitty.

Don’t forget to see other Fiber Arts Friday stuff at Alpaca Farm Girl.

BaconWrap

Alpaca Mittens – With Pattern

It’s Christmas time! Love this time of year because finally get to give family and friends the items I’ve been working on. 

My latest work has been a pair of crochet mittens from our very own home grown alpaca.  I’m mostly following this pattern from Bernat for the mittens.  They call for a change in hook size but I opted to stick with the I-9 hook for the whole thing.  I ended up having to add some stitches because of it for a larger size.  I am very happy with the finished look.  The mittens are not bulky but thanks to the alpaca they are very warm. 

The yarn I had blended at the mill is 80% alpaca, 15% nylon, 5% merino.  This is a wonderful blend.  The alpaca is toasty warm and soft, the nylon adds strength and assists in felting prevention and the merino adds memory so the yarn isn’t flat and has loft to it.   If you’re interested in buying some for your Christmas projects by all means visit our Store!

Don’t forget to visit Alpaca Farm Girl for more Fiber Art Friday posts!


Homemade Alpaca Mittens

Alpaca Slipper Socks With Pattern

Hello Fiber Arts Friday!  I’m back!  I’ve been down and out with the Swine Flu.  One good thing about being forced to be out of work sick is time to crochet.  I had tons of partial skeins of alpaca yarn hanging around and decided to crochet up some socks.  The yarn was bulky so the socks are too thick to wear in shoes making them great for lounging around the fireplace on a cold November morning.

This is my first time writing a crochet pattern so it’s written much like how I crochet, chaotically. 🙂  I made these socks out of Bernat Alpaca and they would fit a medium width foot.  To give you an idea of size in the photos I have wear a men’s size 10 shoe.  To fit smaller feet use the same pattern but a thinner yarn. 

 Click Here for pattern.