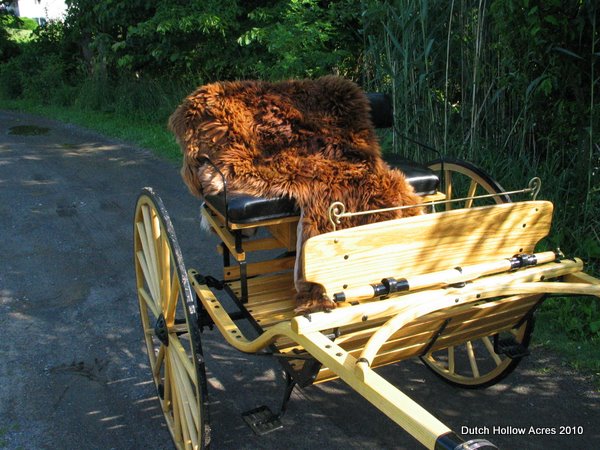
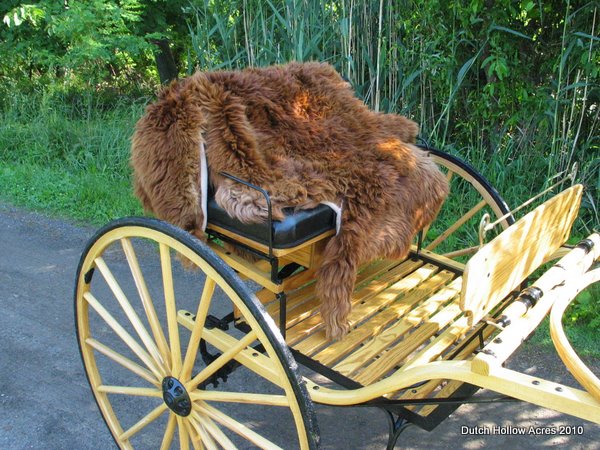
A while back I told you about the unfortunate passing of my alpaca Miracle. We ended up processing her hide and sent it off to be tanned and made into a lap robe. Well the good news is our Miracle Blanket is finished! I picked it up from Sivko Furs, Inc on Sunday and have had a full week to enjoy it.
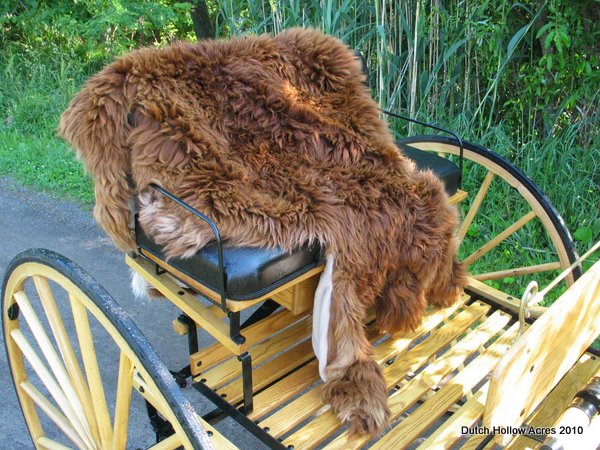
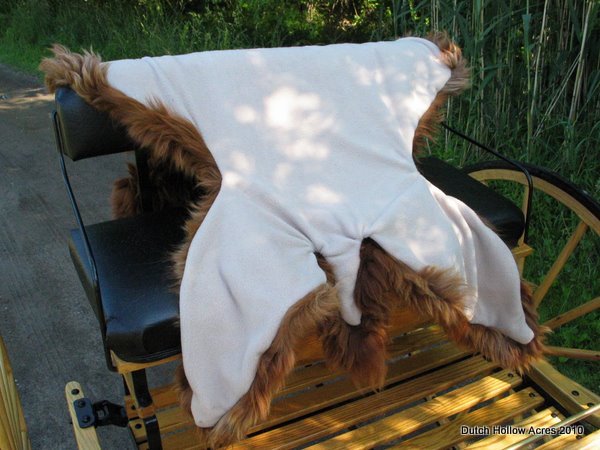
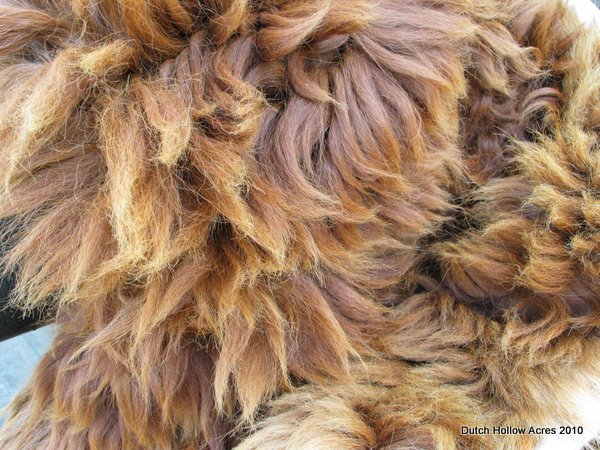
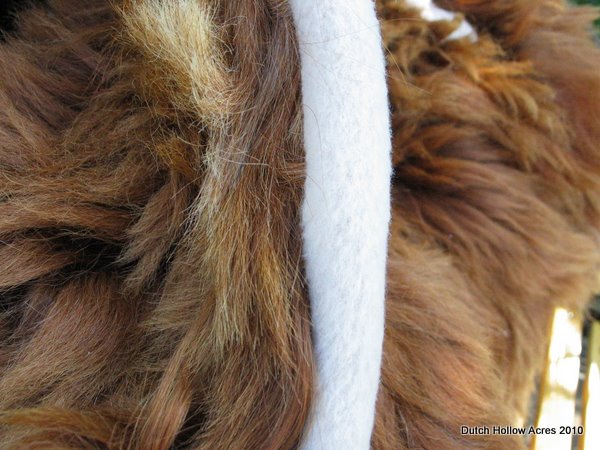
Sivko Furs did an awesome job! I’m thrilled with the outcome. The fur is held tightly to the hide and has been brushed clean and is so soft. Their seamstress did a beautiful job sewing on a soft beige color fleece. She managed to hide the seam for the majority of the blanket and only a small area at the neck shows her stitching where she had to turn the blanket inside out.
Per my asking she trimmed some of the neck off A) so we didn’t have a seam in the fleece backing and B) so I had a piece of fur hide to keep and play with for my own projects. They also included all the other little scraps of hide they trimmed off while making the finished blanket. Maybe in future FAF posts I’ll show you what I plan on doing with them all.
The look and feel of this blanket really made me think of the old carriage lap robes used to stay warm with on cold winter nights. Actually the authenticity of such a lap robe isn’t too farfetched. Did you know in the late 1800’s alpaca was more popular in the US than sheep’s wool? Unfortunately it was a short lived industry since the quantity needed to keep up with demand wasn’t there and sheep ended up taking over as a preferred fiber. Check out my post on Alpaca, Fiber of the Presidents for more info.
If any of you who end up in the same situation as I did be sure to read my post on preserving your alpaca hide and I highly recommend the kind folks at Sivko Furs who had a great turnaround time and a very fair price for processing our Miracle.
Recently we purchased a Wallenstein BXM Chipper Shredder to help with chipping all the trees and scrub brush we took down in our soon to be new orchard area. When considering buying a chipper we thought about going all out and getting the shredder to see if we could make our own livestock bedding.
If you’ve read my past posts about my experiences with different types of bedding you’ll know my distain for straw. I just hate picking through traditional straw bedding. The waste is just awful, it takes me much longer to muck a stall and once I get it out to the manure pile it takes forever and a day to compost. The price of straw vs. the wood pellet bedding I’m using now is night and day and right now I need to bring down the cost of doing business.
In comes the shredder. I’ve read about how shredded straw composts faster and is used at some dairy farms and also by mushroom farmers. So I decided to give it a try. I purchased a 500lb bale of straw for $40 and fired up the shredder. We aimed the shoot into our little red TSC dump trailer, stood up wind from the shredding and let her rip. 3.5 of the big flakes of straw filled the dump trailer really quickly and it filled one of our 11×11 stalls. 1 trailer full gave a great 4-6” deep bedding and covered the whole stall evenly. For comparison 4 ($7) bags of wood pellets gave me the same results. That’s $28 for pellets vs $8 for shredded straw. At this point I have a really big smile on my face.
With pellet bedding I have to add 1-2 bags per week for a stall with a mare and foal. There’s very little waste and I only have to take out the soiled areas. I know from past experience that with traditional straw bedding 3 flakes of straw would give me nice bedding but I had to strip the bed every day and add another 3 flakes. How would the shredded straw do?
Shredding the straw brought down the stalk size to 2-3 inches in length and even broke the stalk open so it no longer was a tube. The result is a very light fluffy bedding that sifts right through my favorite Dura stall fork just like wood shavings would. It doesn’t fall though like pellet bedding but with a few shakes of the fork the horse apples remain and the clean bedding falls through. Pee areas are sucked up nicely and are easy to spot and scoop up with minimal waste. I managed to pick through 3 stalls using just 1 wheelbarrow! Try that with traditional straw bedding!
Clean, dry and out of the wind, rain, and sun Garages or work areas in the barn work great for shearing. Shearing in the hot sun or in a manure pile inside or out just makes for a miserable day, for alpacas and helpers.
Good lighting-Dark animals are very hard to shear in poor light.
Power- A functional power source within 100 feet is appropriate. Most shearers carry long extension cords for this purpose.
Proximity to the animals An efficient/convenient way to keep things going is to have the animals in pens near the shearing site. It is important to have the next animal ready as soon as possible. Getting the next animal sometimes can take longer than the shearing. Truly a waste of time and very frustrating.
ALPACAS
Keep them dry!!! This is the most important thing you can do. Keep them inside….even heavy dew makes a difference. Shearing a soaking wet alpaca just doesn’t work. An animal that is wet because they stood in a bucket is different. Cancellation is certain and rescheduling is difficult.
Getting the next animal Have a system to bring animals quickly to the shearing station.
Fleece Do not worry about debris in the fleece. Rolling in hay before the shearer arrives is not a catastrophe. Please don’t vacuum them before they are shorn….it freaks them out! Clean your fleece later using your skirting table.
PEOPLE
Provide assistants For maximum efficiency it is important to provide at least 3 people to assist the shearer. The shearer shears, one assistant controls the alpacas head, the others can collect fleece and/or prepare the next alpaca to come to the shearing site. Have a plan for who is responsible for each ‘job’ and stick to it. The more animals that you have the more people you should have.
SUPPLIES
Shearer’s bring everything they need to shear your animals. Some shear on the ground, with a shearing table or standing.
Bags- Clear plastic garbage bags work the best. It is the responsibility of the farm to provide the bags. You should have 3 bags per animal, prime or blanket fleece, second and thirds.
Since 2003 Chris and Jody Hatch have owned and operated Salmon River Alpacas in Pulaski NY. Their farm offers alpaca sales, breeding, boarding, brokering services, shearing service, a farm store, and lots of hands on enjoyment. Visit the farm website a www.SalmonRiverAlpacas.com
See Photos from our 2009 shearing with Chris and Jody!
Warning: If you’re a vegetarian, vegan, or think that the killing of Bambi’s mom was cruel you do not want to read this post.
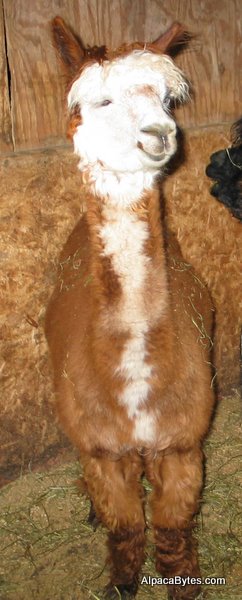
The beautiful alpaca in the photo above is named Miracle. She was a sterile female and a huge one at that. Unfortunately a combination of her age and mammoth size lead to the failure of her knee. I had the awful decision to make to euthanize her and end her suffering since repairing the damage wasn’t possible. Since this was not an expected event I was left scrambling around trying to figure out what to do with her and I didn’t want other alpaca ranchers to be in my same shoes. So, I’m writing this post so others can set up their “disaster plan” and so they have the names, numbers, materials, and talent handy should themselves in the same predicament.
What to do with the body?
Veterinary Research:
Call your vet, local college or veterinary college and see if they would be interested in the body for research purposes. In my case Cornell is out of research monies and didn’t want her.
Burial:
There’s always the popular burial either on your property or at a pet cemetery. If you are going to bury on your property just be conscious of your well water and how a decomposing body might affect it. If you do not own a backhoe you’ll want to have the name/number of someone who can come to you or of a local pet cemetary. You laugh but I actually have a horse buried at a pet cemetary because it was the middle of the winter and we did not own a backhoe or have the ability to dig through frozen ground.
Cremation: Many pet cemeteries and vet colleges offer cremation services.
***********************
Ok this is the last time I’m going to tell you to stop reading if you’re “sensitive” in nature. The truth is alpaca ranching is a business. You paid good $ for this animal either out right or through breeding and now it’s gone. The idea of just digging a hole in the pasture and throwing it away is pretty hard to swallow if you’re like me. There are ways you can capitalize on the death of your alpaca.
Meat: Because your alpaca is now full of tranquilizers, anti-inflammatory meds and carcinogens for treatment and for the vet to put them down, the ability to render them for food is out of the question. I know the thought of eating your alpaca is probably not too appetizing to some but if you’re like me it probably crossed your mind. I can’t help it, I’m a carnivore and I love meat and yes, she looked tasty to me and my husband. I’ll probably get hate mail but the truth is if she died of natural causes she’d be in our freezer.
Fur: Yes fur. Most of us sell those cute cuddly Alpaca teddy bears, fur lined gloves, hand warmers, hats, rugs and more but did you really stop and think where they come from? They all came from the untimely death of alpacas in Peru. The people in Peru realized that the death of an animal can also be capitalized on and so should we. The process is a little gross to many but here are the steps you need to follow to preserve the hide so it can be processed into a fur.
Skinning – Make sure you have the name and number handy of someone who can skin the alpaca for you. In my case the local butcher was willing to skin her for $30 with salt or $20 without. To make the process easy on the butcher and for best results, this step should be done just after death while the body is still warm and before the skin cools and tightens. Make sure you or your butcher removes the tail bone and splits open the tail’s tube.
Scraping– Your butcher may or may not do this step. In my case this is where I took over. Scraping is where you need to remove access fat and meat from the hide. The tools are simple, nitrile gloves and a very sharp knife with sharpening stone.
Grab a hold of the fat or meat with your off hand and scrape the knife across the skin membrane while pulling back on the fat/meat. Surprisingly the skin is very elastic and can take quite a bit of pressure from a blunt scrape but be careful not to puncture the skin. Holes can be repaired by the tannery but every hole will cost you $$$.
The more time and effort you take into scraping the skin down to a clean membrane the better your end product will be.
Salting – The application of salt to the hide stops the decomposition process and halts bacterial growth. You’ll want to use non-iodized table salt and a lot of it. Restaurant food suppliers will be able to sell this to you and it is relatively cheap. $8 for 25lbs worth and you’ll want to have about 75-100lbs on hand. My butcher did not scrape our hide and I salted it for 24hrs before I had time to scrape.
Salted Hide
Lay out the hide on a tarp fleece side down and stretch it out exposing all the skin
Pour on 25lbs of salt in the center of the hide and use your hands to spread the salt evenly to all areas of the hide. Be sure to evenly cover it and don’t forget the edges or any folds including the tail. Any place that the salt doesn’t touch can and will rot or the hair could fall out during processing.
After 24hrs you’ll notice that the salt looks wet and probably bloody in spots that might not have been cleaned well. Wet salt wont wick moisture anymore and you’ll need to do a salt change. Pick up the hide and shake off the salt and brush away any sticky salt areas. Lay the fleece back out and re-salt just as you had before.
You may need to repeat the above process again otherwise let the hide site for 2-3 more days for it to dry out. Check it daily, you don’t want the hide to dry out stiff while it is laying flat, you’ll still want some play in the skin so you can fold it for transport.
Tanning – The next step is to tan the hide to permanently preserve the skin. If you want to know what a tanned alpaca hide will be like think deer skin. I’m sure many of us have owned a pair of deer skin gloves, if not, go try on a pair at the hardware store. The finished hide will be thin and velvety soft on the skin side and your alpacas beautiful fleece on the other. In the tanning process the fleece will be washed, skirted and combed so you’ll have a fluffy end product. You may opted to use your shearers and clip the fleece to a more manageable staple length if it is too long.
Shipping– Once your fleece is dry you’re going to need to get it to the tanner. Chances are you don’t live close to one like I do and you’ll need to ship it.
Shake the salt off the hide.
Fold carefully so not to cause cracks with the hair side in
UPS recommends shipping of hides in cardboard boxes or burlap bags. Inform them you are shipping a salted hide.
DO NOT STORE IN PLASTIC, EVER! Feed bags turned inside out work nicely for smaller hides.
Miracle's hide being inspected by Sivko.
The tannery I’m using is.
Sivko Fur Inc. 3089 County Rt 119
Canisteo, NY 14823
Phone 607-698-4827
Fax 607-698-4344
Want to see their work? Stop by any Cabella’s, they do all of the tanning for the furs and mounts in their stores. Because they are about an hour from our ranch I had the opportunity to visit their facility. I was able to see and get my hands on many different hides like deer, buffalo, bobcat, gazelle, and even an elephant! Here are some photos I took while there.
Tanning DrumShaving the hide to an even thickness.Hides in preserving solution.
Finished Product – The kind folks at Sivko took the time with me to go over ideas of what you can do with your finished fur. They even carefully unpacked a finished bear skin rug to show me what they are able to offer. Ultimately I decided to turn Miracle into a carriage lap robe. While my hide is being tanned I’m now on the hunt to find the fabric I’d like to use for the lining to my blanket. Since Miracle was a beautiful red/brown alpaca I’m thinking something light in color maybe a cream, beige, or yellow.
I hope this post helps others cope with the loss of their alpaca, sheep, goat or other livestock where they would like to preserve the fleece. The process might not be desirable or fun but the end product is something that can be sold to recoup the costs of losing the animal or something that you can keep as a reminder of them forever.
At this time Miracle’s hide has been scrapped, salted and sent to Sivko Furs to be tanned. The entire process of tanning and finishing the fur into a lap robe will take 8-12 weeks. Stay tuned for more information and to see the finished robe!
I have a love hate relationship with my barn cameras. I love the fact I can watch the alpacas from my “day job” and see what they are up to. I hate that I can see when they are in trouble and am helpless to do anything about it.
Tuesday I noticed my moose of an alpaca, Miracle, in trouble. From the stop motion images I received from the cameras it looked to me like she was colicing. She was up she was down she’d roll on her side, bob her head and generally look really uncomfortable. I made a call into the vet and worked out an arrangement to pick up some banamine on my way home just before their office closed.
After several agonizing hours watching her I finally got home with drugs in hand. I opened up the barn door and was sickened by what I saw. My girl Miracle was not colicing at all in fact it was much worse. She refused to put weight on her right hind leg and held it tenderly in the air. She was obviously in pain and I gave her the banamine to help with that. Examining the leg I noticed her knee was 3x the normal size and not even remotely resembling the shape of a knee should be. My heart sank, I knew immediately what the outcome would be. Because of the late hour all I could do was make her as comfortable as possible and keep her alpaca friends close to her for comfort and security until I could get the vet out in the morning.
Poor Miracle now runs and plays at the rainbow bridge among all the other great alpacas who have left this world. She was a great girl and our happiest alpaca. The markings on her face always made it look like she was smiling and I’m sure she was. She loved to play in the water buckets and bask in the sun. She was perfectly comfortable with her human friends and wouldn’t bother getting up from a nap just because we wanted to mow the pastures. Instead she’d watch us go by (within 6 inches sometimes) and then was smart enough to reposition herself onto the freshly mowed grass so we could continue mowing. She was a sterile alpaca and instead all that energy went into her size. She weighed in well over 200lbs making her look more like a llama in size than an alpaca. Unfortunately it was her over sized frame that the vet seems to think lead to the failure of her knee.