For those of you who follow me on Twitter or Facebook you know I’ve been working hard all week on this one and I’m sad to say I wasn’t able to finish it yet. Errrr. No worries, here’s what I’ve done so far.
At the Northeast Alpaca Expo last weekend I picked up 2.5lbs of cotton core spun alpaca rug yarn. I was just tickled to find rug yarn around a cotton core instead of jute. This meant I could easily crochet it without too much of a fight. Unfortunately any time you involve a ‘S’ size crochet hook there’s always a fight involved.
I actually made 2 rugs. The first one I made a SC rectangle rug and set it out and looked at it for a day and decided I didn’t like it at all so I ripped it apart. I wanted an oval rug and when I crocheted it the traditional way it was way too thick for my liking and the thickness resulted in a smaller rug size wise.
What I ended up doing was a hybrid between a braided rug and a crochet rug. I made a huge long single crochet line out of the rug yarn and then sewed it together like a braided rug. The last step is to felt it which is where I’m at now.
Here is a photo of my very soggy rug. It is not yet complete and is just in the beginning stages of felting. I must say, felting a rug is fun; it’s a lot like stomping on grapes. Just put it in a kiddy pool with warm water, some good tunes and stomp away!
I mentioned in an earlier post that I recycle the twine that comes off my hay bales. I really try not to cut the twine when freeing a bale and if I have to I make a conscious effort to cut it next to the knot. This way I have a length of twine that is the most usable. With most of my hay used up I have a healthy pile of twine ready for repurposing. This time it went into a rug.
Recycled Twine Door Mat
Great for scrubbing dirt off your boots
Materials:
Size ‘P’ crochet hook
Baling Twine – approximately 100 bales worth for a 3×2 foot mat
Scissors
Grocery bag
Muscle power!
Preparing the Twine
Step 1:
Twine around bales have knots in them. You want to cut these knots off and toss them in your grocery bag. Jute twine is a nice fire starter so I keep mine to get a camp fire going in the summer.
Step 2:
Knot each strand to another to form a long jute rope. Make sure the knots are nice and tight and trim any extra twine hanging out on the off side of the knot. Yes, I save this too for fire starter
Crochet Pattern
Row 1: All SC – This row will be the Length of your rug – Add one extra SC and turn Row 2: Into backs only! SC all the way add one and turn Row 3-?: Repeat Row 2 until desired width of rug is achieved
By crocheting into backs only this creates a ribbed pattern which helps with 2 things. It gives your knots a place to hang out and creates ridges so you can scrub the mud and dirt off your barn boots.
Though the pattern is very simple I would have to say this is an intermediate project for one reason. Twine is a P.I.T.A. to work with! It’s not flexible, carries a twist and every 6 feet you have a knot to deal with. When you’re finished with your rug, your hook arm will be very very tired.
If you’re part of the Fiber Arts Friday crowd check out Wonder Why Gal for more cool projects.
Rag rugs are a blast to make and do not require any fancy techniques like crocheting. The rugs are fairly quick to make and you can see the results of your efforts take shape in just a few rows. This technique is not limited to rugs, you can also make other items like a rag placemat, dog bed, cat bed, bedspread, basket, or anything else you can think of. These rugs can be great kids projects too since it involves fun things like ripping of fabric.
Making a Rug Tool:
Rag rugs are often called Toothbrush rugs because of the type of tool used to make them. Folks used to cut the head off an old toothbrush and file it down to a point while using the pre-drilled hole (for hanging your tooth brush) as a place to attach the fabric to. Today, there are fancy prefabricated tools you can use or you can still make your own. Technically a rug tool is just a really big needle.
I’m cheap so I chose to make my rug tool out of scraps I found in the basement. My needle is made out of scrap copper wire and electrical tape. It might not be pretty but who cares, it’s free.
Making Fabric Strips:
For my rug project I decided to repurpose some old flannel sheets. I cut a little slits along one edge of the sheet every ½ inch or so. Now comes the fun part! Grab that little fabric tag and rip! The flannel sheets tore very evenly right down to the end without the need to cut each strip out by hand. If you have a cat hanging around this process is very fascinating and you might have to fight for some of your strips back.
How To Connect Fabric Strips:
Now that you have all of these strips hanging around you need to be able to put them together. Many suggestions have you sewing the strips together, which is great, if you have that kind of time to waste. Easiest method I found is to cut a small slit in the ends of each strip and slipknot them together. Thread one strip through the slit you made in the other and then feed the tail of the 1st strip through the slit you made in the end. Pull tight and voila you have connected the 2 strips together.
Starting Your 1st Row:
These directions are for a rectangular rug. I will cover oval rugs and circle rugs on another post. Start your rug at the connecting slipknot where your 2 fabric strips meet. 1 of these strips will be the “core” the other will be used to tie the knots. I’m right handed so find it easier to hold my strips in my left hand and use my rug tool in my right. In the photos the light colored fabric is the “core” and the red is what I’ll be tying knots with.
– First cross the red over the white so it looks like the number “4”
– Feed the tail of the red behind the white and through the loop hole in the “4”
– Pull the red all the way through and make your first knot. Keep this first row fairly taught but not so tight that you won’t be able to get your tool through again later
– Make sure your “core” fabric stays straight and doesn’t get curled up into your knots
– Continue knotting until you achieve the width of the rug that you want
– Row 1 can be a bit of a pain. You may find it easier to use a safety pin to secure it to something. I usually like to stand up and place the first knot on a hook and knot my first row from there.
Starting Row 2 – ? Again, these directions are for a rectangular rug. This is the easier of the rug patterns to make and does not require any extra stitches per row. The length of your first row is the width of your rug. How many rows you add on from this point determines the length of your rug.
– When you’re ready to start your next row, fold your “core” fabric over so it is now playing alongside your row of knots.
– With your rug tool stab the center of the last knot you had just made
– Make sure you still go behind the “core” fabric before you come through the loop
Changing colors:
Solid color rugs are no fun of course you want to change colors. When you get to a point you want a new color just cut the fabric off, cut a new slit in the end that is part of your rug and tie in your new color.
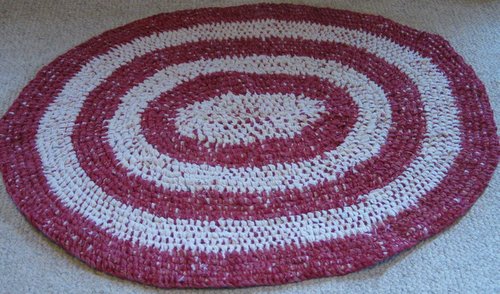
For those of you who follow me on Twitter I’ve been talking about a Christmas gift I’ve been working on for the past few weeks.Well with the holiday finally over I’m finally able to indulge all of you with what I’ve been working on; A Rag Rug.
Rag Rugs, also known as Tooth Brush Rugs, Knotted Rugs, or Cottage Rugs are a 100% recycled that anyone and I do mean anyone can make.If you are like me and have ADHD this project is just for you since you can see results from your labor very quickly. You can also choose to stop at most any time making something as small as a placemat or continue on for large area rugs.
You can use most any linen for these rugs. In the case of this Christmas rug I chose to use old flannel sheets.Since this was my first rug I did not document the process I used to make it.I do plan on documenting my next one.I’ll show you everything from how to make the strips, how to chain them together and the technique needed start and end your rug.
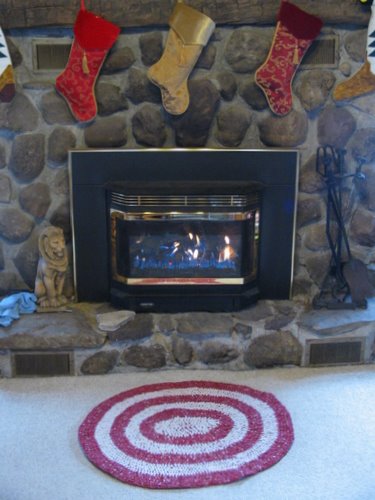
Until then, please enjoy some photos of the Christmas Rug.I hope my brother, his wife and most likely their puppy enjoy it thoroughly.
A good starting point for making these is at http://www.ragrugcafe.com/ but found many missing instructions. She does do a very nice job in her videos showing you the general technique. I’ll do my best to show you in several future posts how I went about making my rag rug.